Table of Contents
Configuration Name Booking WindowMax Stay Minimum Time Between Reservations Rate AdjustmentsMinimum stayGap ManagementRate Adjustments Overrides
From the Stay Rules tab, you can create a new Stay Rules Configuration by clicking on Add Stay Rules or modify an existing Configuration, by clicking on the Configuration's name.
The Stay Rules Configuration page contains:
-
Configuration Name
The name has a limit of 50 characters. We suggest you give an explanatory name so that you won't need to open the configuration when assigning it. -
Booking Window

- "Allow bookings to be made a minimum of X days from today" allows you to set how many days in advance are required to accept bookings. For example: if you accept bookings for the same day, type 0. If you need the bookings to be made at least 1 day in advance, type 1.
- "Until a maximum of X days from today" allows you to set until when your calendar is open. For example: if you type 730 days, you will always have the calendar open for a bit more than 2 years.
- "Allow bookings until X AM/PM on the same day": this option is available only if you accept same-day bookings and it allows to set until what time a property can be reserved for the same day.
-
Max Stay
This is the maximum stay allowed. For example, if you allow stays of maximum 30 days, you should type 30. -
Minimum Time Between Reservations
There are 2 options:-
 "I do not want to enforce a minimum time between reservations", meaning that you can have reservations checking out and checking in the same day.
 - "I want to enforce a minimum of X days between reservations effective from X until X" allows you to set a minimum of days (up to 7) between reservations for the period of time of your choice so that the cleaning process can be taken care of with the extra measures requested for this pandemic meeting both guests and authorities demands. In addition to closing availability for the days assigned for cleaning, when you define a minimum time between reservations, this will automatically create an amenity* that will be sent to Vrbo/HomeAway and will be seen by the guest (e.g. defining 2 days between reservations will create the “ GUEST GAP PERIOD 48 HOURS” amenity).
-
-
Rate Adjustments
In this section, you can define your general Minimum Stay and LOS price strategy, which is based on the number of nights reserved and usually decreases the nightly rate for each night added.
You can either Add a LOS Rule by clicking on Add LOS Rule or you can Edit or Delete an existing LOS Rule by clicking on the 3 dots next to it.
In the "Rate Adjustment" pop-up, add the number of nights, the adjustment (if needed) which is in percentage and can be positive or negative, and if this number of nights is "Required when available".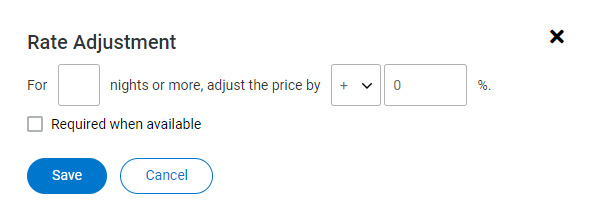 Add LOS Rule
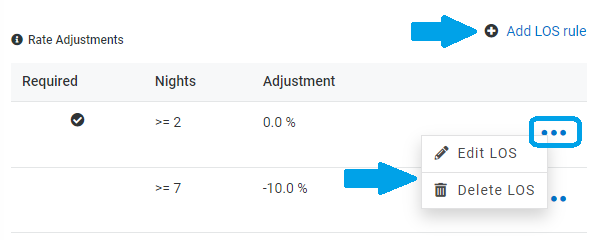
Minimum stay
To set the Minimum Stay, you simply need to add a LOS Rule and make it "Required when available".
If you create more than one LOS rule and none is "Required when available", the lower number of nights will define the minimum stay setting.Gap Management
With Kigo Channel Manager you can easily fill your calendar gaps and increase your revenue by using the LOS Rules.
The Gap Management allows you to receive reservations for fewer nights than the set minimum stay with an increased rate, but only when the minimum number of nights required is not available.
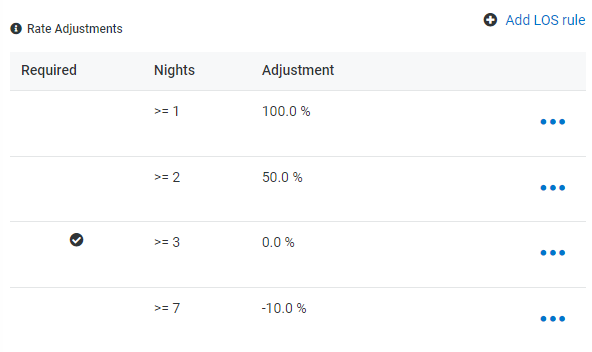 Gap Management Example
In this example, there is a LOS rule of 3 nights required when available (Minimum Stay), but we also have a rule of 1 night with an increase of 100% and another one of 2 nights with an increase of 50%. If in the calendar there are 3 or more nights available, a reservation of 1 or 2 nights won't be allowed. But if in the calendar there are only 1 or 2 nights available, you will be able to receive a reservation with the corresponding increase. -
Rate Adjustments Overrides
The Rate Adjustment Override is used to define a different minimum stay and price strategy for specific periods (Seasons). With the Overrides,
First you need to create a Season by clicking on Add Season and selecting the dates. In the Season tab you can also define CTA (Closed To Arrival) & CTD (Closed To Departure) days, so if you don't allow check-ins or check-outs for certain days of the week you need to select them and these will show as orange (see image below).
If you wish to modify or delete a Season, click on the 3 dots next to it and choose the corresponding option.
Once the season is created, you need to add the LOS rules by clicking on the 3 dots next to it and then Add LOS.
The process is the same as the general Rate Adjustments.
To see also the past seasons and their rate adjustments, click on "Show all rate adjustments"