There are different ways to create tasks, that you can use depending on your needs:
- Assign duties to a crew member for a territory. This assignment will allow you to select that crew member for a specific task on the turns page (for the unit in the territory).
For example, you work with 8 employees: 4 of them are cleaners, 2 handle check-in, and check-outs, one of them does maintenance and another one handles inspections. For each of them you will select their specific tasks within the territory by doing the following:
1. Settings wheel > Geographies > territories > click on the territory name
2. For each of the employees, select their duty/ies by clicking on the checkbox for their row under each task column. In the image below, the employee Ben performs cleanings and maintenance tasks and Carla handles check-ins, check-outs and inspections:

3. Once all selections are made, click on the blue button Save Changes on the top right side of the table.
b. Assign a specific task:
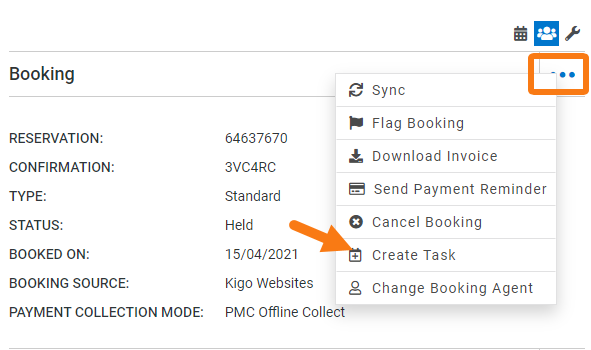
- If linked to a reservation: access the reservation page > Click on the 3 dots next to the Booking section > select Create Task. We recommend using this way of creating tasks if there are guests staying and you’d like to inform them through GuestXP of the task being performed.
If not necessarily linked to a reservation: on the top right section of the system > click on the plus sign > leave “Task” in the pop-up. We recommend to use this way of creating tasks for tasks performed when the unit is empty.
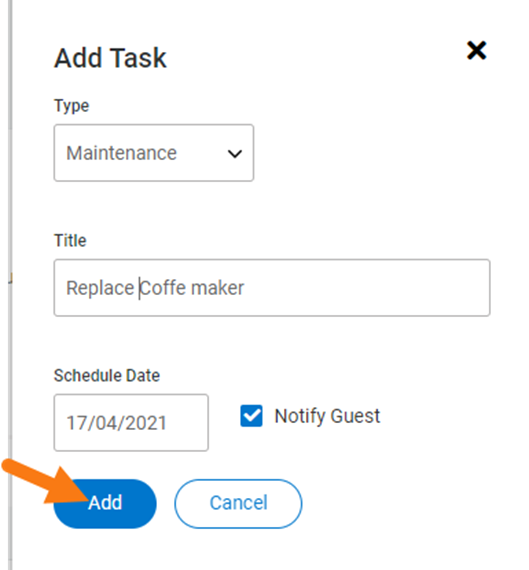
2. A pop-up opens. Within the pop-up, select:
- Unit (only if task is added via the plus sign): select the unit the task will be performed in
- Type: task type (Checkout, Cleaning, Guest Check-in, Generic, Inspection, Maintenance, Pick-up, Pre-arrival clean, Request)
- Title: name your task everyone involved understands it
- Schedule date: add the date in which the task needs to be performed
- Select “Notify Guest” checkbox if you’d like the guest to know the task has been assigned (this is recommended if the guest has raised a concern or an issue and the task is linked to that concern and will happen during the guest stay in the unit). This is only applicable if the task is created within the reservation.
- Attach an image or PDF to give more information to your employee performing the task of what’s required from him/her. Only available if the task is created via the plus sign.
-
Add or Save the task
 Option 1: Add a task through the reservation page
 Option 2: add the task using the plus sign
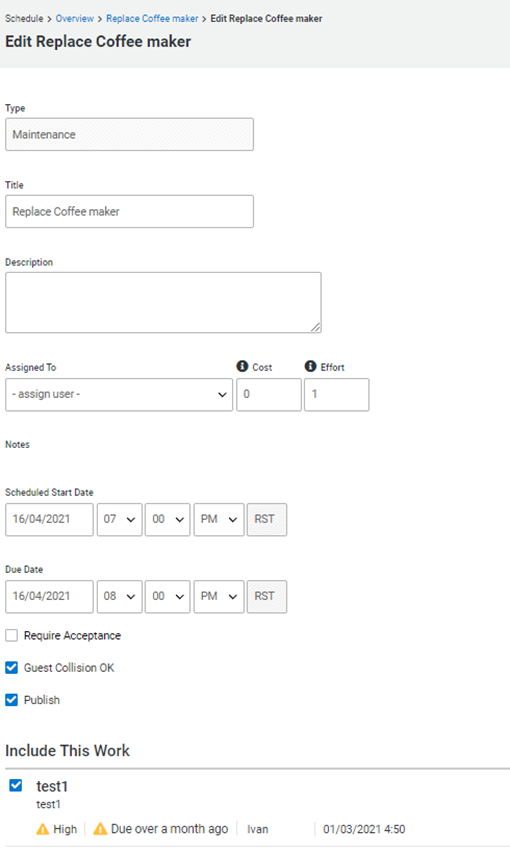
 - The task page opens and there you will be able to:
- Add a task description for your employees
- Assign it to a specific employee, determine the task’s cost and effort
- Edit scheduled start date (time from which the task can be done) and due dates (the maximum date and time the task should be performed by)
- Require acceptance checkbox: select if your employee needs to accept the task
- Guest collision OK checkbox: select if there are guests staying at the unit and you have agreed with them for the task to be done during their stay
- Publish checkbox: leave selected if you immediately need the employee to see the task among their due ones. If not needed because the guest still needs to confirm, don’t publish it (the employee won’t receive anything yet) and it can be done at a later time.
- Include other work items that can be performed at the same time, if needed. For example, as an employee needs to bring a replacement object to a unit, a pool cleaning can be done by the same employee in the same visit.
- Remember to scroll down and Save your task edits.
Once saved, the system will prompt the task page, as your employee will see it. Depending on the task status, the employee will see a different symbol on the top left side:
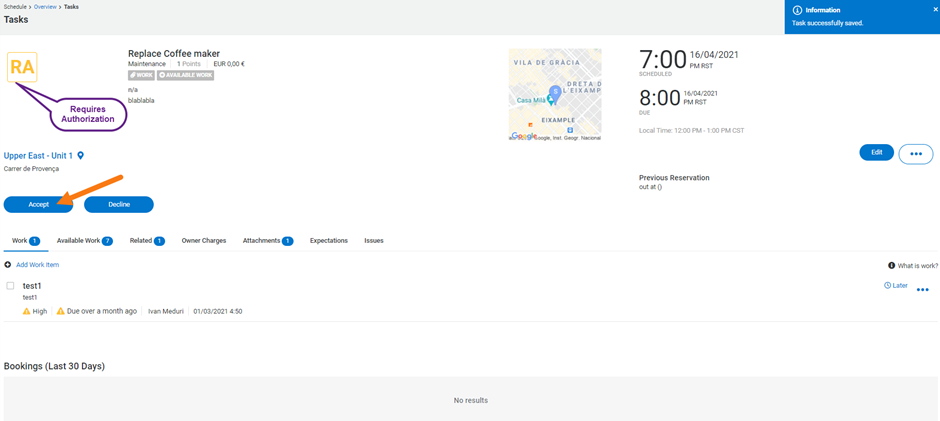
- RA = requires authorization. The employee needs to accept the task as shown in the image below:
- P = pending if the task has not yet started. The employee will need to click on “Start” when they start it and then “Finish” once completed
3. W = waiting (used when an Inspector is at the unit but can’t start the task until de cleaning has been completed)
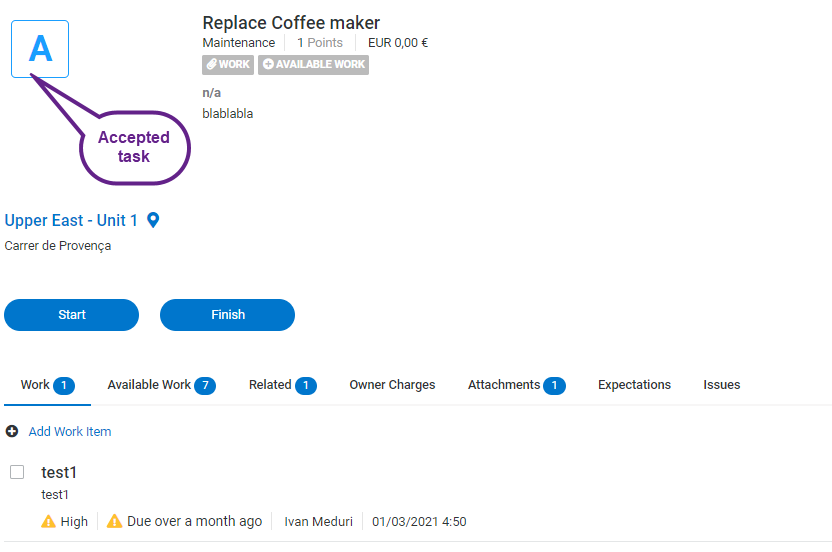
4. A = accepted, it shows when a task that requires acceptance has been accepted by the employee who needs to perform it. The employee will be able to start and finish an accepted task.
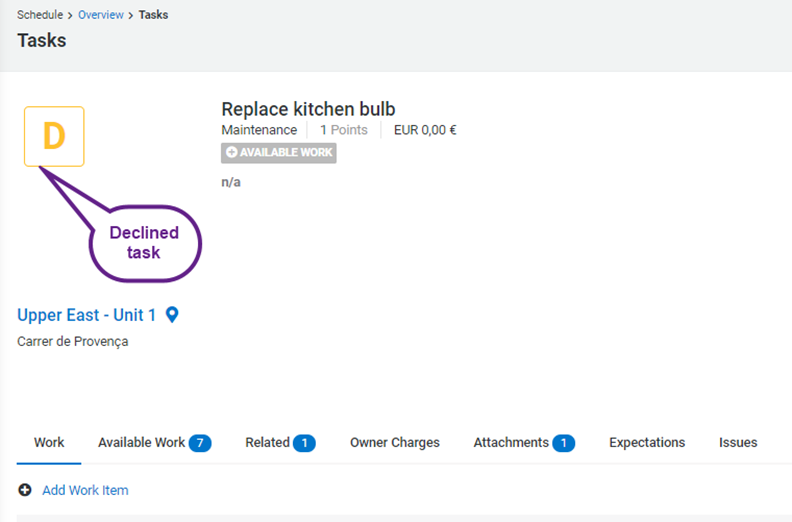
5. D = Declined task. The employee has not accepted the task. The operations manager will need to visit the tasks panel > search in order to re-assign it to a different employee.